Why thoughtful classroom support matters
As a paraprofessional supporting autistic children, I’ve learned that the smallest, most thoughtful changes can transform how students experience the classroom. Over the years, I’ve discovered that when we make the environment predictable, supportive, and inclusive, students feel safer—and that safety helps them learn, grow, and connect with others.
In this post, I want to share some of the simple tools and strategies we use in our classroom. These aren’t complicated or expensive—they’re everyday adjustments that make a world of difference for our students and their families.
Together, we can build classrooms where every child feels valued, supported, and empowered to thrive..
What We Use in the Classroom
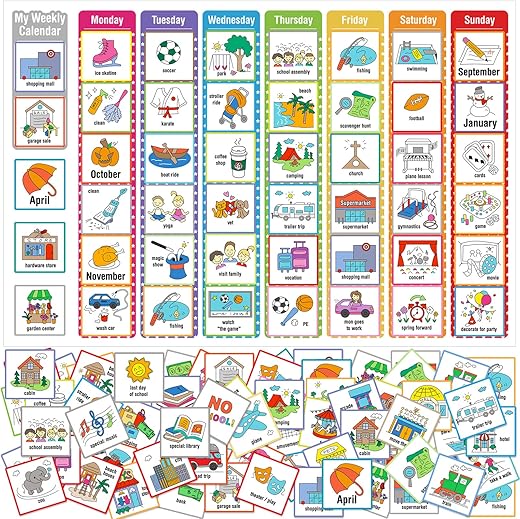
In my classroom, we’ve found that a few simple tools make a big difference in supporting autistic students:

These visual supports not only help students recognize words and build vocabulary, but also encourage independence and confidence in following routines. Posting a clear, consistent schedule reduces repeated reminders, lowers stress, and brings more calm for teachers, parents, and students alike
Step 1 — Assess and set up with intention
Can a quick 10-minute walk-through really reveal the biggest barriers for a student? In my experience—yes.Start by observing the student and classroom routines over several days. Look for patterns, triggers, and moments of success. These insights will guide small, targeted changes that are easy to adjust if needed.
Here’s what to pay attention to:
Once you’ve gathered notes, make the environment work for the student instead of against them:
Finally, schedule short check-ins—even a 1–2 minute signal at the start of lessons can help. Involve paraprofessionals and families by sharing your observations and asking for their input. Minor, testable adjustments not only build predictability but also lower sensory load, setting the stage for smoother routines.

We also use these headphones with students who struggle with loud noises. During fire drills or in overwhelming situations, having a pair of noise-cancelling headphones ready helps them feel safe and calm. It’s been a simple but powerful support tool that reduces stress for our students.
The battery life is outstanding—up to 60 hours of playtime—and when we forget to charge them, just a quick charge gives hours of use. Whether it’s for long trips, busy days, or providing students with extra comfort, these headphones have been reliable and effective.
For us, they’ve become more than just headphones—they’re a tool for peace, focus, and independence.
Step 2 — Build Predictable Routines and Visual Supports
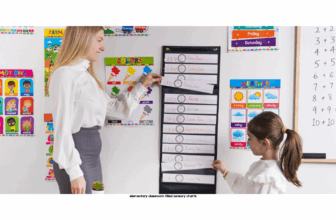
Predictability is power: could visuals cut meltdowns by half? They often do.Start by introducing a clear daily visual schedule with both pictures and words, tailored to the student’s level. This helps them see what’s coming and reduces anxiety about the unknown.
For transitions, break them into mini-steps with countdowns (five… three… one). We even give some students a transition card they can carry. When we tried this with a second grader, his hallway refusals dropped almost immediately—just having the card gave him a concrete sense of what to do next.
Here are the supports we use and teach:
Finally, build independence by teaching the student to make simple choices using choice visuals (like picking a preferred activity). Celebrate each step of progress with immediate, concrete feedback so the routine feels rewarding and worth repeating.
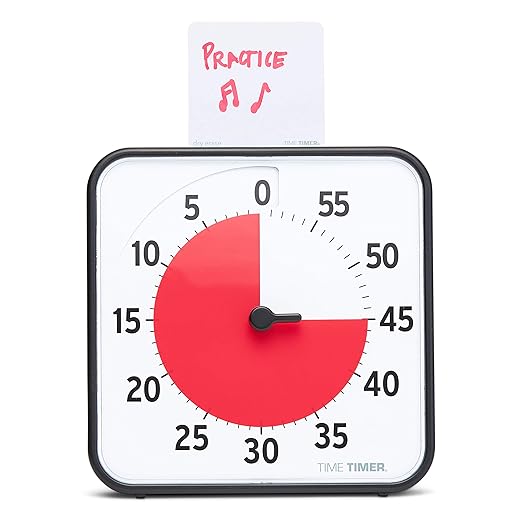
What I love is how simple it is—students can actually see the time disappearing as the red disk moves, which gives them a clear, visual cue of how much time is left. That visual reminder takes away the constant “how much longer?” questions and helps ease the stress of moving from one activity to the next.
It’s also really flexible. The timer is magnetic, so I can put it right on the whiteboard where everyone can see it. It comes with a dry-erase activity card, which makes it easy to write down what we’re working on, and the optional alert means I can choose whether or not to have a sound at the end—perfect for when we want quiet transitions.
Whether it’s for study sessions, chores, or daily routines, this timer has been a game changer. For my students, it turns time into something concrete and predictable. For me, it’s a simple way to keep the day running calmly and on track.
Step 3 — Manage Sensory and Communication Needs
What if a simple sensory tool could turn frustration into focus?We’ve seen how the right sensory tool can turn frustration into focus. For some of our students, noise-reducing headphones, fidget tools, a dimmable lamp, or a movement break plan make all the difference. When we introduced headphones for one third grader, their reading time doubled within a week—all because the extra noise wasn’t overwhelming anymore.
We don’t just hand students a tool and hope it works. Instead, we teach and practice routines around them. For example, we rehearse how to appropriately request a break—using a break card, a gesture, or AAC—until the request becomes calm and reliable. That way, students learn to use their supports with confidence.
Here’s how we build consistency:
By layering sensory tools with clear communication supports, we’ve watched students shift from shutdowns or refusals to moments of focus, independence, and success.

For kids who get restless or anxious, these fidgets give them a safe outlet to release energy without disrupting the class. They’ve also been great during transitions, while waiting, or even when traveling—keeping little hands busy and minds relaxed.
Step 4 — Differentiate Instruction and Collaborate with Families
Why going it alone is the biggest mistake—partnerships accelerate progress.We’ve learned that the biggest mistake is trying to go it alone. Progress happens faster when we partner with families and specialists.
In the classroom, we adapt lessons to match student strengths and reduce barriers. That might mean chunking directions into single steps, modeling the first step, or breaking lessons into 5–10 minute segments. We also give students multiple ways to respond—pointing, typing, drawing, or speaking—so they can show what they know in the way that works best for them.
We set clear, measurable, small goals that are easy to track. For example, “read for 5 minutes + use break card once.” We log progress daily in simple notes, which makes growth visible for the student, family, and team.
Our supports are designed to fade over time. We might begin with a visual cue or prompt, then gradually step back until the student acts independently. This builds real confidence and self-reliance.
Family collaboration is key. We keep communication regular and respectful, sharing quick one-line successes or small strategies (like a visual schedule for home or a simple script parents can use). Just as importantly, we ask what’s working at home so we can align our approaches.
We also involve specialists and the students themselves in co-creating strategies that are realistic and family-centered. By reviewing progress often and adjusting quickly, we avoid waiting for minor issues to become significant challenges.
For us, instruction and support work best when they’re a team effort—shared between educators, families, specialists, and students.


Good points but felt a bit generic in places. The assessment step could use sample forms or a checklist — I kept thinking “okay, but what exactly do I write down?”
I tried the communication supports and one kid who barely talked started using a PECS card to say ‘help’ — cried happy tears ngl.
Also, typo alert in the PDF under Step 3 (it says ‘senosry’ instead of sensory) — easy fix but thought you’d want to know.
So glad to hear that, Claire — those moments are the best. And thank you for flagging the typo, we’ll correct ‘senosry’ to ‘sensory’ in the next upload.
LOL the routine police in my room are real — kids actually correct each other on the visual schedule now. 😂
Also, pro tip: introduce a ‘wiggle’ station for brain breaks. Saved me many meltdown minutes.
Good note re: approval — ours is low-rise and has a staff-signed permission slip. Worth the paperwork imo.
Haha, you get a community of routine enforcers for free! Wiggle stations are brilliant — care to share what you include in yours?
My wiggle station has stretchy bands, a small trampoline, and weighted lap pads. Rotated items weekly so it stays novel.
We got pushback once from admin about the trampoline — safety concerns. Make sure you clear bigger items first.
Quick thought: differentiation doesn’t have to be complicated. A couple of leveled prompts and visual choices at center tables did wonders for engagement in my mixed-ability class.
Would love to see example leveled prompts if anyone has them. Struggling to phrase scaffolds without sounding condescending.
Exactly — practical small moves often have the biggest impact. Thanks for sharing the classroom hack!
Really appreciate the visuals section — we added simple picture schedules and it honestly changed morning transitions in my class.
Line 2: kids know what comes next and the whole room is calmer.
Line 3: I paired it with a 1-min timer and it helped a couple students who struggle with waiting.
Line 4: Small tweaks, big difference.
Line 5: Thank you for the step-by-step tone!
This is so helpful. Do you laminate the pictures or use Velcro? I’m trying to set one up and keep changing the order lol.
Thanks for sharing, Maya — love hearing concrete examples. If you don’t mind, could you share what type of timer you used? Visual timers vs. audible-only can make a difference.
We used a visual sand-timer app on a tablet — kids respond really well to the visual countdown. Also +1 for picture schedules!
On sensory needs: the suggestions are solid but I wish there were more on how to balance inclusion with safety — e.g., when a student hits or throws things during sensory overload.
Any practical classroom rules or quick de-escalation scripts would be great.
We use a ‘safe hands’ visual and role-play it with the class — kids learn alternative ways to express big feelings. It doesn’t eliminate incidents but reduces escalation.
Good point, Jason. We usually recommend a calm break spot + pre-taught escape script (e.g., ‘I need a break’ + a trusted adult prompt). Also, safety plans written with families and support staff help ensure consistent responses.
I want to share a quick progression we used after reading a similar guide:
1) Week 1: identify triggers (quiet observation)
2) Week 2: introduce 1 visual routine
3) Week 3: practice with role-play
4) Week 4: add sensory supports (noise-cancelling headphones, choices)
By week 6 we saw steady progress — not perfect, but measurable.
Do you have a quick form for tracking progress? A simple checklist would make showing growth to parents easier.
Thanks for outlining that timeline, Marcus — so helpful. Your stepwise rollout mirrors our ‘small changes, steady progress’ idea.
This is a really thoughtful guide. A couple of small critiques: some of the language felt too clinical for parents — maybe a ‘parent-friendly’ summary would help. Also, loved the idea of co-creating plans with families. 👏
Agree about the tone. Add real-world snippets or quotes from families to humanize it.
Parent-friendly + visuals = higher uptake. I speak from experience 😂
Great suggestion, Robert. We’re working on a one-page parent-friendly handout version — aiming for plain language and visuals. Expect it in a future update!
Yes please — parents often skim long docs. A checklist or two-pager would be ideal.
Love the idea of including family quotes — will consider adding anonymized examples in the next edit.
Absolutely loved the focus on small changes. I was SO worried about overwhelming families with big plans, but the idea to start with one predictable routine was a game changer.
I started with arrival routine and then slowly added lunch, recess cues, etc.
Kids and parents both appreciated the gradual approach. 🙂
Great approach, Sarah — gradual is often the most sustainable. If you want, share the first arrival step you used and we can suggest visuals to pair with it.
Love the PDF idea. Any tips for making it non-judgmental so families don’t feel like we’re ‘telling’ them how to do mornings?
Same here — started with just a 3-step arrival and it stuck. Also sent a one-page PDF to families with photos of the routine, helped a ton.
Also add an option for ‘flex days’ — routines can be exceptions, and giving that permission reduces stress for everyone.
Quick tip: frame it as ‘What helps my child thrive at school’ and invite families to add what works at home. Collaborative language reduces defensiveness.
Loved the family collaboration section. Quick question: how do you document accommodations so it’s clear for subs? I made a Word doc once and nobody saw it 😅
Try an ‘on-the-desk’ sub folder with a 1-page highlights sheet and photos of seating/visual supports. Put a sticky note on the sub folder: ‘Read first: Student supports’. That tiny nudge helps.
Short and sweet: visuals + calm corners = less chaos. 👍
Question: in Step 1 you recommend sensory checklists — any free templates people have used? I’m on a tight budget and would rather adapt than build from scratch.
Thanks Derek! @admin I’ll take you up on that editable doc if possible 🙏
I used a free Google Doc checklist and printed it double-sided. Simple categories: sights, sounds, touch, movement, smell. Saved me a lot of time.
We linked to a couple of free templates in the resources (PDF checklists). If you can’t find them, DM and I can share a basic editable doc you can adapt.